by Homer Dennis
Most Effective Methods to Fix "Windows 10 Critical Process Died" Error - We all hate the blue screen of death in Windows. It usually happens due to error Critical Process died in Windows. If the same message popped up on your computer, then you should never ignore it.
Contents

Windows 10 Critical Process Died is a very serious issue. You must try to find the root cause of this problem. Otherwise, your computer will suffer from frequent crashes.
Like most of the other Window system errors, this error happens due to the clash between different system services. You must list all the possible causes to fix this error. If you don’t know much about the Windows operating system, then this article is perfect for you. You can find various solutions to fix your problem.
Windows system is not bug-free like Linux. Many things can go wrong in Windows. Blue Screen of death or BSOD is a very common problem in Windows. It happens when your system freezes or stops operating. In such cases, you will find a BSOD with the error message "The CRITICAL_PROCESS_DIED bug check has a value of 0x000000EF". This problem can interrupt your work. You can’t do important work in your computer. Thus, it is important to fix this problem.
BSOD has been a part of Windows systems since Windows NT 3.1. Most users consider it as the most annoying part of Windows. This problem only occurs when a fatal error happens in your system. Its purpose is to inform the user about the potential cause. Hence, you can prevent further damage. There are more than 500 BSOD error codes. One of them is Critical Process died.
When this error happens, you will see only a blue screen on your computer. There can be many reasons behind this error. But, it is easy to fix this error. You can stop some services to get rid of this problem. This error only occurs when a critical process stops working.
This error can also occur when an unauthorized program is trying to edit operating system files. In such cases, the operating system immediately stops working. Due to this, you might see a critical process died message in your computer. In this article, we will first discuss the cause of this problem. After that, we will discuss how to solve this problem.
The Windows OS makes sure that only authorized programs can access certain parts of your system. Most of these applications are important for your computer. If any unauthorized application tries to manipulate the data, then Windows will immediately shut it down. This causes Critical Process Died error in your computer. Sometimes this error can also happen due to your operating system experiencing some malfunctions.
Most times this happens due to buggy driver files. For example, sound and video card drivers are full of bugs. Sometimes there is bad memory sector in your RAM. Your operating system will fail to use certain services due to a memory problem. Thus, your operating system will crash and show Critical Process died error. But, sometimes the cause of this error is not obvious.
This error can happen even on new laptops. Thus, you must take a broader approach while dealing with this problem. You might have to address multiple causes while fixing this problem. We have added various methods using which you can fix this problem. After trying these methods, you must test your system. This will help you in determining which solution was the right one.
There can be reasons behind this reason. Sometimes poorly coded device drivers can cause these problems. Your storage devices can also cause this problem. But, you don’t need to worry about the cause. You can follow the methods mentioned below to fix your computer. Just follow the instructions and your computer will start working properly.
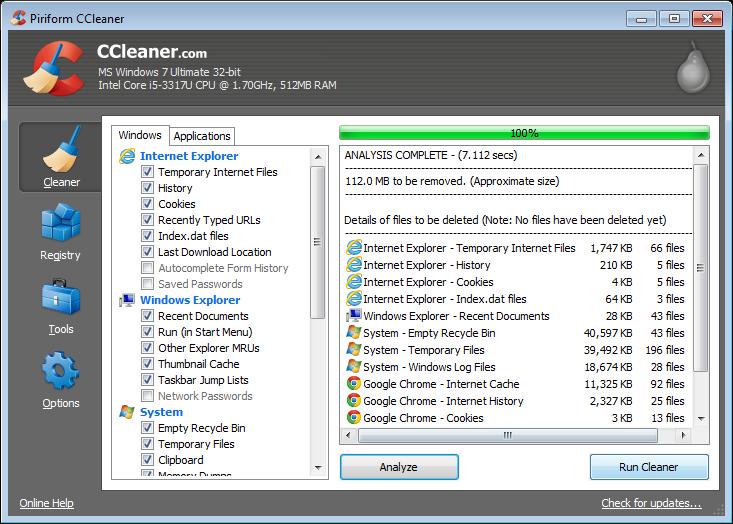
Sometimes the error can occur due to corrupted files or virus. Thus, it is best to use CCleaner to clean your computer first. Follow the below steps to fix Critical Process died error.
• First, you need to download CCleaner on your computer. You can download it from here (https://www.ccleaner.com/).
• After downloading, you need to install CCleaner on your computer.
• Launch the antivirus and let it scan your computer.
• CCleaner will automatically scan your computer and delete some files.
• After scanning process, you can use CCleaner .
• Click on the " CCleaner " section which is under the Windows tab.
• Now, you need to wipe all the sections which can cause this problem. You must clear Internet, Multimedia, Utilities and Windows section.
• Once you have checked all the sections, you can run the cleaner by clicking on "Run Cleaner". CCleaner will clean all those sections.
• After this, you need to clean Registry files. Click on the "Registry" tab which is under the Windows tab.
• Scan for all the broken registry files.
• Click on the option "Scan for Issue". CCleaner will start the scanning process.
• After the scanning process, all you need to do is click on "Fix Selected Issues".
• Make sure to take a backup of your registry files. You can restore your registry files if something goes wrong.
• After taking a backup, click on "Fix All the Selected Issues".
• Now you need to reboot your computer. Check if the error still persists.
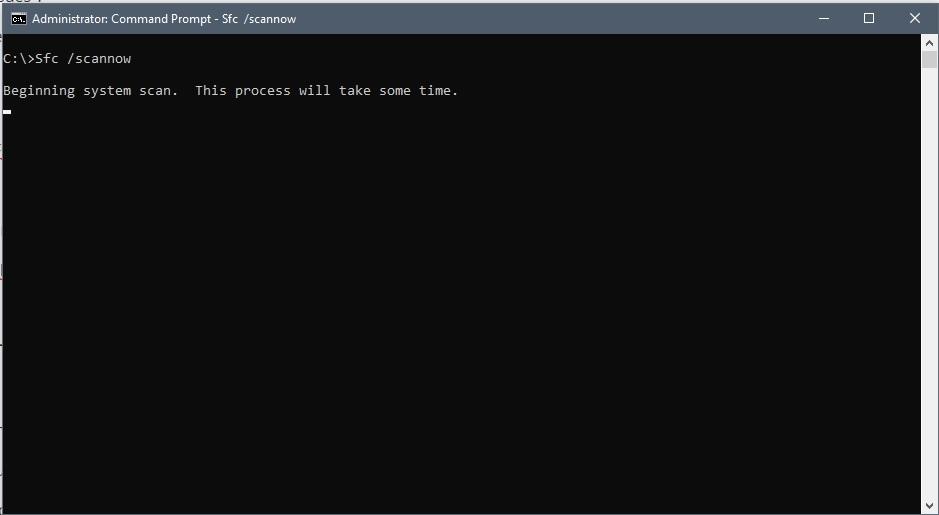
If the problem persists, then you can use DISM and SFC tool to fix this error. Follow the below steps to fix Critical Process died error.
• First Press X + Windows key together.
• After that, open "Command Prompt (Admin)" on your computer.
• You need to enter the following command in the CMD screen :
sfc /scannow
sfc /scannow /
• After entering the command, hit the enter key.
• Wait for the command to execute. After that, you can reboot your computer.
• After rebooting, open command prompt again in your computer.
• Type the following command in the command prompt screen and hit enter
a) Dism /Online /Cleanup-Image / CheckHealth
b) Dism /Online /Cleanup-Image / ScanHealth
c) Dism /Online /Cleanup-Image / RestoreHealth
• DISM command will look for errors in your computer. Wait for it to finish.
• Sometimes DISM command won’t work in your system. In such cases you can use the following command:
Dism / Image:C :\offline /Cleanup-Image / RestoreHealth / Source:c :\test\mount\windows
Dism /Online /Cleanup-Image / RestoreHealth / Source:c :\test\mount\windows / LimitAccess
• "C:\ RepairSource \Windows" is the path of repair source in this command. If you have a repair source in different locations, then you must use that path.
• Once you have executed the command, restart your pc. Check if the error still persists.
Sometimes untrusted drivers can cause this error. You should check if all the drivers are legit. There is already a built-in tool for this. You can use driver verifier to check if all the drivers are legit and trusted. If there is an untrusted driver, then you can replace it with a trusted driver.
This error mostly happens due to outdated drivers. Thus, it is important to update all your drivers. Follow the below steps to update your drivers.
• First, open your search bar.
• Search for "Device Manager" in the search bar.
• Open the best matching result from the list.
• Now, you can click on the arrow to expand the device lists.
• Check if any device has a yellow exclamation mark with it.
• If any device has an exclamation mark, then it implies that the driver is old.
• You can fix this problem, by uninstalling the driver. Right-click on that device and select "Uninstall" option.
• Reboot your computer to save changes. Windows will automatically install the new driver for the device. Thus, all your devices will work perfectly fine. You can also use third-party software to update your drivers.
• First, open your search bar.
• Search for "Device Manager" in the search bar.
• Open the best matching result from the list.
• Search for "Power options" in the control panel.
• After that, select the option "Change what the power buttons do".
• After that, click on "Change settings" link.
• Uncheck the Hibernate and Sleep option.
• Click on save the changes and reboot your PC. Check if the problem still persists.
If nothing works, then this is the last way to solve this problem. You can reset your Windows computer to factory settings. If you are unable to access your computer, then restart your computer multiple times. After sometimes, it will automatically show the Automatic Repair option. After that, click on the Troubleshoot option. You will find "Reset this PC" option on next window. Click on it and then select "Remove Everything". This will rest your computer.
If your computer is opening, then you can follow below steps to reset your PC:
• First, open your search bar.
• Search for "Settings" in the search bar.
• Open the best matching result from the list.
• Click on the Update and Security option.
• After that, click on the "Recovery" option.
• You will see a Reset this PC section. Click on "Get Started" button.
• After that, you need to select the option "Keep my files". Don’t click on "Remove everything" otherwise all files will get deleted.
• On the next step, Windows will ask for installation media. Thus, make sure that you have your installation media.
• Select your Windows version on next screen. Click on the drive where your Windows files are located . By default it is the C: drive.
• After that, click on "Remove my files" option.
• Now, all you need to do is click on the "Reset" button.
• Follow the instructions to complete the reset process.
Sometimes third-party apps can disturb your operating system. Thus, you need to run a clean boot on your computer. It will help you in diagnosing the issue. Follow below steps to clean boot your PC:
• First, open your search bar.
• Search for "System Configuration" in the search bar.
• Open the best matching result from the list.
• Click on the "Selective Startup" option.
• Now, you need to uncheck "Load startup items".
• Click on the service tab and check "Hide all Microsoft services" box.
• Select the "Disable all" options to disable unnecessary services.
• Now, open the "Task Manager" on your computer.
• Click on the Startup tab and disable all the startup items.
• Click on "OK" to save changes. After this, reboot your PC.
• Again, open System Configuration in your computer.
• Enable half of the services which are in the Services list.
• Check if the problem still persists.
• If the problem persists, then repeat previous steps. This time enables the rest of the services.
• If the problem is not solved , then try troubleshooting the harmful application.
• Lastly , you need to boot your computer again.

About Homer Dennis
Born and raised in an environmentally conscious family, Homer developed a strong awareness of the impact of human activities on the planet from a young age. This early exposure to eco-friendly practices and sustainability principles inspired her to pursue a career focused on promoting renewable energy and advocating for a more sustainable lifestyle.
 |
 |
 |
 |
Check These Out
Your lucky day! Visit FREE Gifts GiveAways for it. Whitelist the AdBlocker to get more Free Rewards
Then click anything below to proceed
|
|
|
|