by Homer Dennis
Best Ways to Fix Explorer.exe Class Not Registered Error in 2023 - A lot of people will definitely agree that getting an error code on your PC can be very annoying. "Explorer.exe class not registered" is an error that occurs in windows computer. There are lots of reason why you might see this error.
Contents
The most common reason for this error is when you have two or three processes conflicting in your system. When this happens, you will always get a pop-up dialog box with the error "Class not registered". This will prevent any software associated with the program from launching. As a result of this, applications like Microsoft Edge, Internet Explorer, Outlook, and Google Chrome would not open. At times, even Start Menu and Windows Explorer will not launch.
Because of the impact, this error can have on a computer, it is important to know how to fix it. There are different ways you can fix the error on your computer. The methods you have to use depends entirely on what caused the error in the first place.

The windows explorer is a very important program on a windows computer. There are a lot of things one can access through it. It is also the program that is commonly affected by the error. Once the program experiences the error, working on files that are stored on your computer’s local drive will be difficult and almost impossible. Because of this, it is important to fix the error as quickly as possible.
There are five (6) possible ways you can go about fixing the explorer.exe error on your computer. All the methods are effective but the methods fix explorer.exe errors based on what initially caused the error.
This is very straightforward and is the fastest method you can use in fixing the "Class not registered" error for your explorer.exe program. When you restart an application on a computer, all the configurations and current processes the program is currently undergoing will reset. Resetting the Windows explorer can easily fix the issue your explorer is experiencing.
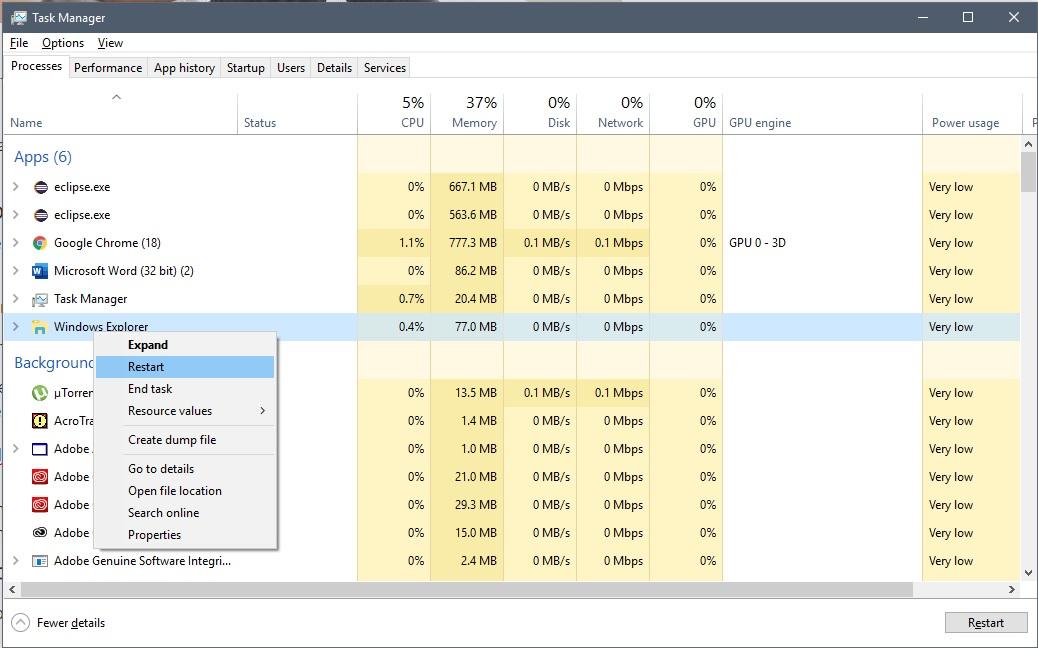
To restart the windows explorer, you need to access your system’s task Manager. Here are the steps you have to follow if you want to use this method.
1. You can access the Task Manager in a number of ways. The quickest is by simply hitting the Ctrl + Shift + Esc together. This will automatically open the Task Manager window.
2. Once the window opens, you will be on the Processes tab. There will be a list of programs running. Some of these might also be background processes. Search the list for the Windows Explorer task. Simply right-mouse click on it and then press "Restart". The restart button is located at the bottom right side of the Task Manager window
This is the easiest way you can fix the error on your computer. This method mostly works if you get this error code when launching your Windows explorer. Windows iCloud has a history of conflicting with your system’s operating system which in turn prevents your Windows explorer from launching. A quick disable of the iCloud program and all its related services can get your Windows explorer up and running. You can easily do this with the Task Manager program. The steps involved are below:
1. To start, simultaneously press the Ctrl, Shift and Esc buttons on your keyboard. This will open the Task Manager program.
2. Once the Task Manager Window opens, there are two ways you can approach disabling iCloud.
a. Apps Tab:This is the first tab you see on the screen. There are usually a lot of applications here. You need to find iCloud from the list of apps here.
- Once you locate it, right-click on it. Then click End Task. This will disable the iCloud on your system
b. Start-upTab:This is a simpler way of easily locating the iCloud. The reason for this is because there are fewer applications or program here which makes it easier to locate the program you are looking for. To get here:
- By following step 1, your Task Manager window should be open on your screen. There are a series of tabs on display. Click the Start-up tab.
- Next, right-click on the app. A small dialog box will appear with some options. You need to select the "Disable" option.
3. Regardless of the approach you used, App tab or Start-up tab, once you are done with the steps above, you have to restart your PC. This will allow your computer to apply the changes you just made.
Your Windows explorer should not launch successfully without any error. However, if this method does not work, you can check the next method.
Note: You might want to revert the changes you made in the Task Manager i.e. Enable the iCloud you just disabled. To do that:
- Simply open Task Manager with the Ctrl, Shift and Esc button pressed together
- Navigate to the Start-up tab. Locate iCloud, right-click and select Enable.
This is another fix if you are getting the "Class not registered" error when you try to launch your Windows File Explorer. This method entails changing some of the settings of all the programs and services linked with your explorer. You can do this by following the procedures listed below.
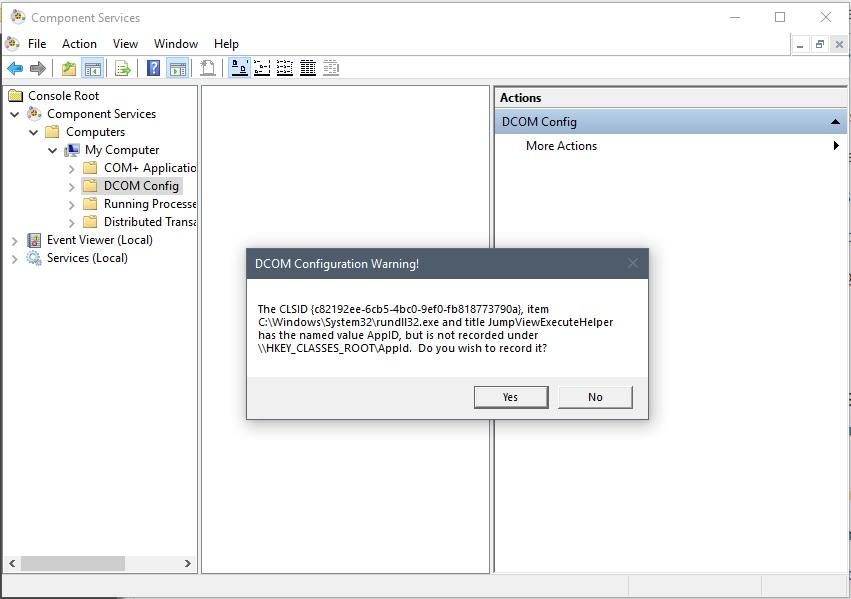
1. You can access the Component Services window via the Run box. You can quickly open the run box by pressing the Windows + Rbuttons together.
2. Once the box is open, next you need to type in dcomcnfg in the Space you see. This will immediately open the component Services window.
3. On the new window on your screen, Click "Component Services". Next, click "Computer" and then click "My Computer". A list of folders will appear.
4. Find the folder named "DCOM Config" and open it. Your computer might send you some warning messages. Should you see them, click "Yes" to proceed.
5. Once this is done, you should restart your computer to save the changes.
After your computer restarts, try launching your Windows Explorer to see if you still get the error. If the error is still not fixed, you should try out either of the remaining two methods below.
There are some files stored on your computer that are essential for the smooth running of any program on your computer. One of them is the DLL file. A malfunctioning or corrupt DLL file can cause a lot of hitch on your PC. In a case when it happens, you will not be able to do certain things on your computer. For instance, installing game software on your computer will be impossible. You will not be able to open some applications too.
The explorerframe.dll is the DLL file that allows Internet explorer program to run. When you get the "class not registered" error, there is a high chance that the DLL is corrupt. Simply re-registering the DLL file can fix the error. You can do this from the Command prompt window.
There are certain steps you have to take if you want to use this method.
1. Open your system’s Command Prompt with Administrator privilege. To do this, you have to press the Windows + X button together. There are two Command Prompts on the menu that appears on your screen but you have to select Command Prompt (Admin).
2. Command prompt window will open. Next, you have to type in the code "regsvr32 ExplorerFrame.dll". Once that is done, you can then press Enter
3. The code you entered will then start processing. The speed of the process depends on your computer.
4. Once this is done, you have to close the Command prompt window and restart your PC. You have to do this so that your computer can save and apply the changes you just made.
This should definitely fix the error code. However, if you still get the error code when you launch your Internet Explorer, you should check the second step of fixing internet explorer error below.
Internet Explorer is another explorer program that can develop the "Class not Registered" issue. If you have tried re-registering the internet explorer DLL file on your computer but the error still remains unfixed, you can also try this method.
The procedures involved in this method are simple and very easy. To get started you have to:
1. Simultaneously press the Windows and R button. A small dialog box will appear. Next type in "Control Panel" and press Enter. This will take you to the "Control Panel" window.
2. As soon as the window opens, locate the "View by" option at the right side of your screen. Click it and a drop-down box will appear. Select "Large icons" from the box
3. This will open a new section on the window with a list of options you can use to modify your computer. Select "Programs and Features" from the list.
4. At the left-hand side of the screen, you will see three options. Select "Turn Windows features on or off" and a pop-up small window will appear on the screen.
5. From the new window, locate the "Internet Explorer" feature and uncheck the box beside it. This will activate a pop up where you have to press "Yes" to continue.
6. Once the process is complete, close the Control Panel Window and Restart your computer.
Note: Your computer might take a while to reboot
Although it is a simple step, you might want to try other methods before giving this method a go. This is because you will lose a couple of things associated with your former account. Hence, ensure you have accurately tried the other methods above before trying this one.
Creating a new Microsoft account can fix the error "class not registered" error you get when you want to launch an Explorer program. To create a new Microsoft account, you can follow the steps outlined below:
1. Navigate your way to your computer’s settings. You can quickly do this by pressing the Windows + I key shortcut combination.
2. If your computer is running Windows 10, the settings window should appear on your screen. However, if you are running a Windows 8 or 8.1 on your computer, you have to click the "Control Panel" option.
3. There are two approaches here.
a. For Windows 8/8.1 users: on pressing Windows + I buttons, a menu will appear on the right-hand side of your screen.
- Select "Control Panel" and click "User Accounts and Family Safety".
- Select "Family safety". You should now see an option that says "Create a new user account"
- Click on this option and follow the steps.
b. For Windows 10 users: Before you can create an account, you have to log in with your local account. This is an important step for the method to work. You can log in with your local account by following this step:
- Press shortcut keys windows + I. This will quickly direct you to your Settings menu
- Navigate to the "Accounts" section and select "Sign in with a local account instead". Once you select this option, you will receive a prompt to enter your current Microsoft account’s password.
- Once this load, you now have to enter your local account’s Username and password.
- Select the "Sign Out" option and click the "Finish" button.
The process is complete and you can now follow the steps below.
- Go to the "Accounts" section again. From there you need to click on the "Family" option.
- A menu will appear with some options on it. On the Left-hand side of the screen, click on the option that says "Other People"
- Then click another option that says "Add someone else on this computer". This option should be on the right side of the screen.
- Next, you will have to type in the email associated with your Microsoft account. Click "Next" and you will now be able to log out your old Microsoft account.
- Once the old account logs out, you can now sign in with a new account.
You do not have to restart your computer after this process. Instead, you can now launch the program you were trying to run when you got the "Class not registered" error.
If the issue still persists and your Windows or Internet explorer is still not running, you can try the last method below.
There is not much you can do here. If you have tried all the methods above but your Windows Explorer or Internet Explorer still gives the error message, you might need to visit a technician that can fix your PC.
As earlier stated, the class not registered error is not only associated with the explorer program. Other important programs on a Windows PC can develop the issue. Below are some of the programs and how you can fix them.
Getting a class not registered error in your computer’s Microsoft Edge browser usually ends up affecting your Internet explorer. This means that after a while, your internet explorer might also have the same issue when you want to launch it. There are two ways of fixing this error and they are discussed below:
This is entirely a wild shot but has been pretty effecting for some users. Usually, a lot of computer users set Google Chrome or other related applications as their default application. If you get the error when launching the Edge program, simply setting it as default can fix the issue. To do this just:
- Press Windows + Xbutton on your keyboard. A dialog box will appear at the bottom left corner of the screen with a list of options. Select "Program and Features" and a new window will open.
- Very close to the top of the window and beside the address bar, you will see an "arrow point up". Click it and it will take you to a subcategory called "All Control Panel Items".
- From the list, you will select "Default Programs".
- Locate the "Set your default programs" option and click it. A new window will load. This might take a couple of moment depending on how fast your system is.
- Once the programs load, locate Microsoft Edge from the list of programs displayed on your screen and click it.
- Some information will appear next to it on the screen. To complete the procedure, click "Set this program as default" and press "Enter" on your keyboard or click "Ok" with your cursor
- Close the control panel window and restart your computer. This should fix the error. If it does not, you can try Step B
This is another method that can fix the error your Microsoft Edge program is experiencing. This method works best when the error affects both your Edge and Internet Explorer application. Here is how to go about it.
- Press Windows and R buttons together to open the Run window. Now type services.msc in the available box and click "Ok"
- A Services window will appear and from the list displayed on your screen, you need to locate "Internet Explorer ETW Collector Service".
- Right Click on the option (once you find it) and select "Start". Your system will start processing. Once it is complete, close the window and Restart your computer.
This should fix the problem and you should be able to start up your Edge program without any issue. If the problem still persists, you might also follow the steps previously discussed above to create a new Microsoft account.
A lot of people have experienced this issue and some have even been forced to uninstall and re-install their Chrome browser but it does not usually work. This error usually occurs if a file in your System’s registry is corrupt. The step below will guide you to resolve the issue without having to reinstall your Chrome browser.
- Press Windows + R buttons on your Keyboard. This will open the Run window on your screen. Type in regedit.exe in the Search bar and press Enter.
- Before you proceed, you need to back up your current registry hive. This will save you a lot of trouble in case you get mistakenly delete a file which can lead to a whole lot of other issues.
To back up, click "file" on the Registry Editor Window you just opened. A drop-down box will appear and you will see a few options. Select "Export" and save the back-up file.
- Once you do that, Click on the HKEY_CLASSES_ROOT folder to expand. Carefully locate the Chrome folder, right-click and delete it.
As soon as you do that, restart your computer. This should fix the Class not registered error.
Note: In case you mistakenly delete a wrong folder, you can simply roll back the changes you just made by importing the back-up file you saved. To import, follow the same steps you used when exporting.
This is not very common but at times when opening JPEG files on your computer, you might experience "Class not registered" error. To fix this, you can use Windows Photo Viewer instead of your computer’s default image viewer.
Follow the procedures below if you are affected.
1. In case you do not have Windows Photo Viewer program on your computer, you can download and install it HERE For windows 10. For users using older Windows operating system, you can download FastStone Image Viewer. It works the same way as Windows Photo Viewer.
2. Whichever one you download, go to the folder where you saved the picture you want to open.
3. Right-click on the picture and choose "Open with". It will bring a couple of default applications. You have to select "Choose another app" or "Choose Default Program" depending on the Windows your PC runs.
4. You can now locate Windows Photo viewer or the FastStone Image Viewer app.
5. Check the box that says "Always use this app to open .jpg files", click "Ok" and you are all set.
You can now open the picture or any other picture on your computer
Although there are a number of methods you can use in fixing the "Class not Registered" error, it is still very annoying when it occurs. This is because for a method to work totally depends on how the program became affected in the first place.
The methods above are some of the best ways you can easily fix your computer. Hope it helps!

About Homer Dennis
Born and raised in an environmentally conscious family, Homer developed a strong awareness of the impact of human activities on the planet from a young age. This early exposure to eco-friendly practices and sustainability principles inspired her to pursue a career focused on promoting renewable energy and advocating for a more sustainable lifestyle.
 |
 |
 |
 |
Check These Out
Your lucky day! Visit FREE Gifts GiveAways for it. Whitelist the AdBlocker to get more Free Rewards
Then click anything below to proceed
|
|
|
|